3 Lock 与 Condition
3 Lock 与 Condition
3.1 互斥锁
3.1.1 锁的可重入性
"可重入锁"是指当一个线程调用 object.lock() 拿到锁,进入互斥区后,再次调用 object.lock(),仍然可以拿到该锁。
通常的锁都要设计成可重入的,否则就会发生死锁。
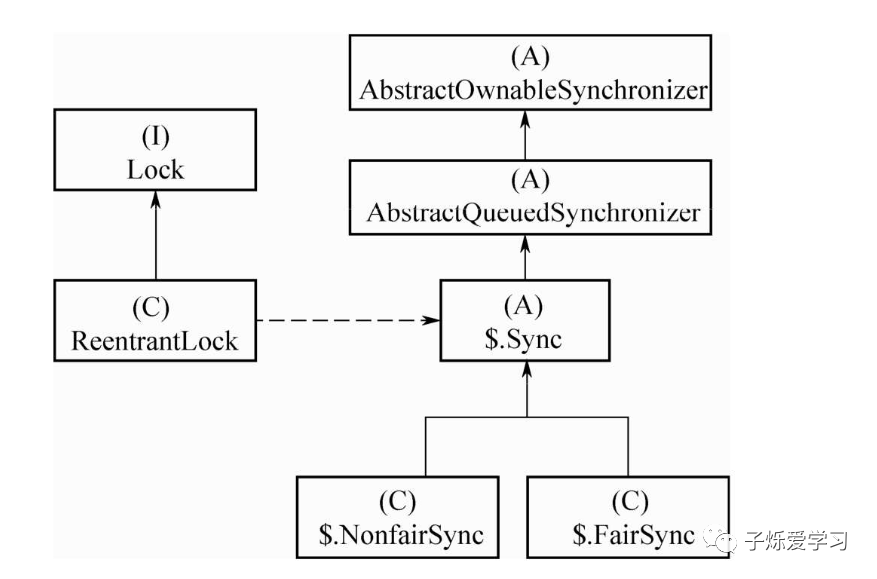
3.1.2 类的继承层次
 其他对 AQS 的探索也可以参考如下资料。 [AbstractQueuedSynchronizer源码剖析(六)- 深刻解析与模拟线程竞争资源](https://blog.csdn.net/pfnie/article/details/53191892)
 3.1.3 锁的公平性和非公平性
- 公平锁:遵循先到者优先服务的规则。
- 非公平锁:随机在等待队列中选一个元素获得锁。
3.1.4 锁实现的基本原理
为了实现一把具有阻塞或唤醒功能的锁,需要几个核心要素:
- 需要一个 state 变量,标记该锁的状态。state 变量至少有两个值:0、1。对 state 变量的操作,要确保线程安全,也就是会用到 cas。
- 需要记录当前是哪个线程持有锁。
- 需要底层支持对一个线程进行阻塞或唤醒操作。
- 需要有一个队列维护所有阻塞的线程。这个队列也必须是线程安全的无锁队列,也需要用到 cas。
针对 1、2,在 AQS 和 AOS 中有实现(AQS、AOS 见类的继承层次图),state 若大于 1 时,说明该线程重入了该锁。
针对 3,在 Unsafe 类中,提供了阻塞或唤醒线程的一对操作原语,也就是 park/unpark。有一个 LockSupport 的工具类,对这一对原语做了简单封装。
针对 4,在 AQS 中利用双向链表和 CAS 实现了一个阻塞队列。阻塞队列是整个 AQS 核心中的核心。
3.1.5 公平与非公平的 lock() 的实现差异
具体可以跟踪 ReentrantLock 里面的 FairSync 和 NonfairSync 源码的 lock() 方法来理解。跟踪源码时,有以下几个难点可以参考以下博文来理解。
可参考以下博客详细理解。 AQS-hasQueuedPredecessors()解析
核心代码贴一部分如下
// 模板代码
public abstract class AbstractQueuedSynchronizer{
	public final void acquire(int arg) {
        // tryAcquire 为 true 即不需要排队,已经拿到锁了,false 需要排队
		if (!tryAcquire(arg) &&
			// Node.EXCLUSIVE 排他锁,也就是独占锁
			acquireQueued(addWaiter(Node.EXCLUSIVE), arg))
			selfInterrupt();
	}

	// 非公平锁模板代码
	final boolean nonfairTryAcquire(int acquires) {
		final Thread current = Thread.currentThread();
		int c = getState();
		// 无人持有锁,就开始下面的抢锁
		if (c == 0) {
			if (compareAndSetState(0, acquires)) {
				// 拿锁成功,设置持有锁线程为当前线程
				setExclusiveOwnerThread(current);
				return true;
			}
		}
		else if (current == getExclusiveOwnerThread()) {
			// 已经拿到锁,即重入锁,设置 state 变量即可
			int nextc = c + acquires;
			if (nextc < 0) // overflow
				throw new Error("Maximum lock count exceeded");
			setState(nextc);
			return true;
		}
		return false;
	}

	public final boolean hasQueuedPredecessors() {
		// 读取头、尾节点
        Node t = tail;
        Node h = head;
		// s 是首节点 h 的后继节点
        Node s;
		/**
		 * 返回false,不需要排队
		 * 1. h != t false, 头尾节点相等,即头尾节点都为 null,或都指向空的节点,不需要排队
		 * 2. (s = h.next) == null true, 头尾节点不等(h!=t),且尾节点为空,即多线程并发时,有其他节点拿到锁了,头节点不为空,尾节点为空(见 enq 方法注释),因此需要排队
		 * 3. s.thread != Thread.currentThread() true,当前线程非首节点本线程需要排队,排第 1 个节点会去抢锁
		 */
        return h != t &&
            ((s = h.next) == null || s.thread != Thread.currentThread());
    }

	private Node enq(final Node node) {
        for (;;) {
            Node t = tail;
            if (t == null) {
				// 队列首次初始化,头尾节点指向空的节点
                if (compareAndSetHead(new Node()))
                    tail = head;
            } else {
                node.prev = t;
				// 设置头节点,再设置尾节点
                if (compareAndSetTail(t, node)) {
                    t.next = node;
                    return t;
                }
            }
        }
    }
}

public class ReentrantLock{
	// 非公平锁
	static final class NonfairSync extends Sync {
        final void lock() {
            if (compareAndSetState(0, 1))
                setExclusiveOwnerThread(Thread.currentThread());
            else
                acquire(1);
        }

        protected final boolean tryAcquire(int acquires) {
            return nonfairTryAcquire(acquires);
        }
    }

	// 公平锁
    static final class FairSync extends Sync {
        final void lock() {
			// 没有抢锁,排队,是公平的
            acquire(1);
        }

        protected final boolean tryAcquire(int acquires) {
            final Thread current = Thread.currentThread();
            int c = getState();
            if (c == 0) {
                if (!hasQueuedPredecessors() &&
                    compareAndSetState(0, acquires)) {
                    setExclusiveOwnerThread(current);
                    return true;
                }
            }
            else if (current == getExclusiveOwnerThread()) {
                int nextc = c + acquires;
                if (nextc < 0)
                    throw new Error("Maximum lock count exceeded");
                setState(nextc);
                return true;
            }
            return false;
        }
    }
}
3.1.6 阻塞队列与唤醒机制
跟踪 AbstractQueuedSynchronizer 里面的 acquire 方法,进入 acquireQueued(addWaiter(Node.EXCLUSIVE), arg)) 源码部分,细节点注释说明。
public abstract class AbstractQueuedSynchronizer{
	// 为当前线程生产一个 Node,然后把 Node 放入双向链表的尾部,线程此时未阻塞
	private Node addWaiter(Node mode) {
        Node node = new Node(Thread.currentThread(), mode);
        // Try the fast path of enq; backup to full enq on failure
        Node pred = tail;
        if (pred != null) {
			// 注意下这里的设计,后续用的 prev 和头节点比较的
            node.prev = pred;
			// 先尝试加到队列尾部,如果不成功则执行下面的 enq(node) 方法
            if (compareAndSetTail(pred, node)) {
                pred.next = node;
                return node;
            }
        }
		// 队列如果未初始化会初始化,头尾节点指向空节点,然后不断自旋,直至成功地把该 Node 加入队列尾部为止
        enq(node);
        return node;
    }

	/**
	 * 线程进入后,即会无限期阻塞,也无法被 interrupt() 函数唤醒,除非有其他线程释放锁后,本线程拿到了锁,才会返回
	 * 即线程返回的一刻,就是拿到锁的那一刻,也就是被唤醒的那一刻,此时会删除队列的第 1 个元素(head 指针前移一个节点)
	 */
	final boolean acquireQueued(final Node node, int arg) {
        boolean failed = true;
        try {
            boolean interrupted = false;
            for (;;) {
                final Node p = node.predecessor();
				// 被唤醒,如果自己在队列头部,则尝试拿锁, p 其实就是 node 的前置节点
                if (p == head && tryAcquire(arg)) {
					// 设置头节点,即头节点由 node.p 变为了 node,前移了一个节点,并且清空了 node 的 thread 和 prev 为 null
                    setHead(node);
                    p.next = null; // help GC
                    failed = false;
                    return interrupted;
                }
				// shouldParkAfterFailedAcquire 第一次调用设置 waitStatus 为 Node.SIGNAL,并返回 false,第 2 次调用返回 true
				// parkAndCheckInterrupt 调用 park() 阻塞自己。注意此时 p 不是假节点
                if (shouldParkAfterFailedAcquire(p, node) &&
                    parkAndCheckInterrupt())
                    interrupted = true;
            }
        } finally {
            if (failed)
                cancelAcquire(node);
        }
    }

	private static boolean shouldParkAfterFailedAcquire(Node pred, Node node) {
		// 初始为 0 状态
		int ws = pred.waitStatus;
		if (ws == Node.SIGNAL)
			// 如果前驱节点的waitStatus为-1,也就是SIGNAL,就返回true。
			return true;
		if (ws > 0) {
			// 如果当前节点的前驱节点的waitstatus大于0,也就是说被CANCEL掉了,这个时候我们会除掉这个节点。即 node.prev = node.prev.prev
			do {
				node.prev = pred = pred.prev;
			} while (pred.waitStatus > 0);
			pred.next = node;
		} else {
			// 如果都不是以上的情况,就通过CAS操作将这个前驱节点设置成SIGHNAL
			compareAndSetWaitStatus(pred, ws, Node.SIGNAL);
		}
		return false;
	}

	// 注意下 selfInterrupt() 的补偿中断机制,即 lock() 不能响应中断,但 LockSupport.park() 会响应中断(返回中断状态)
	private final boolean parkAndCheckInterrupt() {
		LockSupport.park(this);
		return Thread.interrupted();
	}
}
注意 LockSupport 响应中断并不会抛出异常,只是正常返回,参考LockSupport的 park 方法是怎么响应中断的?,代码示例见 com/study/java/concurrent/chapter03/LockSupportTest.java
3.1.7 unlock() 实现分析
unlock() 不区分公平,非公平锁,具体见如下源码。
public abstract class AbstractQueuedSynchronizer{
	public final boolean release(int arg) {
        if (tryRelease(arg)) {
            Node h = head;
            if (h != null && h.waitStatus != 0)
                unparkSuccessor(h);
            return true;
        }
        return false;
    }

	private void unparkSuccessor(Node node) {
        int ws = node.waitStatus;
        if (ws < 0)
			// 将等待状态waitStatus设置为初始值0
            compareAndSetWaitStatus(node, ws, 0);

        Node s = node.next;
		/**
		 * 若后继结点为空,或状态为CANCEL(已失效),则从后尾部往前遍历找到最前的一个处于正常阻塞状态的结点
		 * 进行唤醒
		 */
        if (s == null || s.waitStatus > 0) {
            s = null;
            for (Node t = tail; t != null && t != node; t = t.prev)
                if (t.waitStatus <= 0)
                    s = t;
        }
        if (s != null)
			// 唤醒线程
            LockSupport.unpark(s.thread);
    }
}

public class ReentrantLock{
	public void unlock() {
        sync.release(1);
    }

	abstract static class Sync extends AbstractQueuedSynchronizer {
		protected final boolean tryRelease(int releases) {
            int c = getState() - releases;
            if (Thread.currentThread() != getExclusiveOwnerThread())
				// 只有锁的拥有者才有资格调用 unlock() 函数,否则直接抛出异常
                throw new IllegalMonitorStateException();
            boolean free = false;
            if (c == 0) {
				// 重入锁支持,每调用一次减 1,直至减到 0
                free = true;
                setExclusiveOwnerThread(null);
            }
			// 没有使用 CAS,而是直接用 set。因为是排他锁,只有 1 个线程能调减 state 值
            setState(c);
            return free;
        }
	}
}
TIP
Java AQS unparkSuccessor 方法中for循环为什么是从tail开始而不是 head?
核心原因是与 enq() 方法有关,添加尾元素和调整 tail 指针非原子操作,高并发场景会丢失元素,参考unparkSuccessor理解。
3.1.8 lockInterruptibly() 实现分析
具体见如下源码。
public abstract class AbstractQueuedSynchronizer{
	public final void acquireInterruptibly(int arg)
            throws InterruptedException {
        if (Thread.interrupted())
            throw new InterruptedException();
        if (!tryAcquire(arg))
            doAcquireInterruptibly(arg);
    }

	private void doAcquireInterruptibly(int arg)
        throws InterruptedException {
        final Node node = addWaiter(Node.EXCLUSIVE);
        boolean failed = true;
        try {
            for (;;) {
                final Node p = node.predecessor();
                if (p == head && tryAcquire(arg)) {
                    setHead(node);
                    p.next = null; // help GC
                    failed = false;
                    return;
                }
                if (shouldParkAfterFailedAcquire(p, node) &&
                    parkAndCheckInterrupt())
					// 收到中断,不再阻塞,直接抛异常再返回
                    throw new InterruptedException();
            }
        } finally {
            if (failed)
                cancelAcquire(node);
        }
    }
}

public class ReentrantLock{
	public void lockInterruptibly() throws InterruptedException {
        sync.acquireInterruptibly(1);
    }
}
3.1.9 tryLock() 实现分析
调用的非公平锁实现,源码如下。
public class ReentrantLock{
	public boolean tryLock() {
        return sync.nonfairTryAcquire(1);
    }
}
3.2 读写锁
读线程和读线程之间可以不用互斥了。
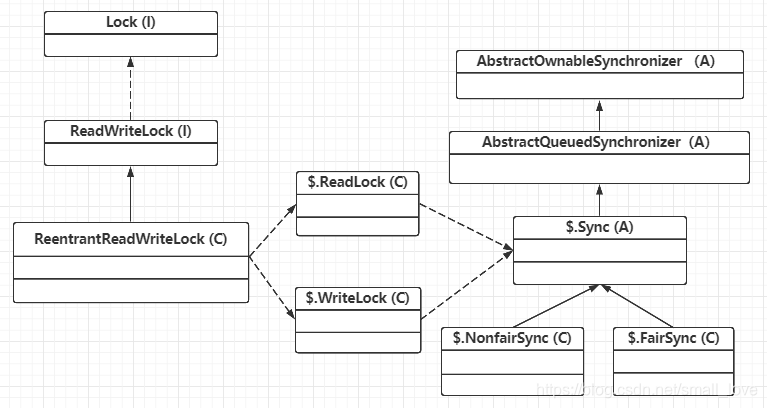
3.2.1 读写锁类的继承层次
3.2.2 读写锁的基本原理
ReadLock 和 WriteLock 是两把锁,实际上它只是同一把锁的两个视图而已。什么叫两个视图呢?可以理解为是一把锁,线程分成两类:读线程和写线程。读线程和写线程之间不互斥(可以同时拿到这把锁),读线程和写线程互斥,写线程和写线程互斥。
原理简单描述如下:
- 底层原理:通过一个 state 变量,高 16 位和低 16 位分别表示读锁和写锁的状态。因为无法用一次 CAS 同时操作两个 int 变量,所以用一个 int 表示 state。
- 状态分析:当
state = 0时说明既没有线程持有读锁,也没有线程持有写锁。当state != 0时,要么有线程持有读锁,要么有线程持有写锁,两者不能同时成立,因为读和写互斥。这时再进一步通过sharedCount(state)和exclusiveCount(state)判断到底是读线程还是写线程持有了该锁。
结合代码理解,如下。
public class ReentrantReadWriteLock{
	public ReentrantReadWriteLock() {
        this(false);
    }

    public ReentrantReadWriteLock(boolean fair) {
		// sync 也有公平和非公平策略,并继承自 AQS
        sync = fair ? new FairSync() : new NonfairSync();
		// readerLock、writerLock 共用一个 sync 对象
        readerLock = new ReadLock(this);
        writerLock = new WriteLock(this);
    }

    abstract static class Sync extends AbstractQueuedSynchronizer {
        static final int SHARED_SHIFT   = 16;
        static final int SHARED_UNIT    = (1 << SHARED_SHIFT);
        static final int MAX_COUNT      = (1 << SHARED_SHIFT) - 1;
        static final int EXCLUSIVE_MASK = (1 << SHARED_SHIFT) - 1;

        /** 持有读锁的线程的重入次数  */
        static int sharedCount(int c)    { return c >>> SHARED_SHIFT; }
        /** 持有写锁的线程的重入次数  */
        static int exclusiveCount(int c) { return c & EXCLUSIVE_MASK; }
    }
}
3.2.3 AQS 的两对模板方法
我们看下 ReentrantReadWriteLock 里面的读写锁怎么使用的 state 变量的,如下源码。
public abstract class AbstractQueuedSynchronizer{
    public final void acquire(int arg) {
        // tryAcquire 被各种 Sync 子类实现
        if (!tryAcquire(arg) &&
            acquireQueued(addWaiter(Node.EXCLUSIVE), arg))
            selfInterrupt();
    }

    public final void acquireShared(int arg) {
        // tryAcquire 被各种 Sync 子类实现
        if (tryAcquireShared(arg) < 0)
            doAcquireShared(arg);
    }

    public final boolean release(int arg) {
        // tryRelease 被各种 Sync 子类实现
        if (tryRelease(arg)) {
            Node h = head;
            if (h != null && h.waitStatus != 0)
                unparkSuccessor(h);
            return true;
        }
        return false;
    }

    public final boolean releaseShared(int arg) {
        // tryReleaseShared 被各种 Sync 子类实现
        if (tryReleaseShared(arg)) {
            // 唤醒所有被阻塞的线程
            doReleaseShared();
            return true;
        }
        return false;
    }
}

public class ReentrantReadWriteLock{
    public static class ReadLock implements Lock{
        public void lock() {
            sync.acquireShared(1);
        }

        public void unlock() {
            sync.releaseShared(1);
        }
    }

    public static class WriteLock implements Lock{
        public void lock() {
            sync.acquire(1);
        }

        public void unlock() {
            sync.release(1);
        }
    }
}
读锁和写锁都有各自的公平、非公平实现,2(公平锁) * 2(读写锁) = 共 4 种组合,如下源码。
public class ReentrantReadWriteLock{
    static final class NonfairSync extends Sync {
        // 写线程抢锁的时候是否应该阻塞
        final boolean writerShouldBlock() {
            // 写线程在抢锁之前永远不被阻塞,是非公平的
            return false;
        }

        // 读线程抢锁的时候是否应该阻塞
        final boolean readerShouldBlock() {
            // 如果队列第 1 个元素是写线程的时候,要阻塞
            return apparentlyFirstQueuedIsExclusive();
        }
    }

    static final class FairSync extends Sync {
        final boolean writerShouldBlock() {
            // 公平的,写线程排队拿锁
            return hasQueuedPredecessors();
        }
        final boolean readerShouldBlock() {
            // 公平的,读线程排队拿锁
            return hasQueuedPredecessors();
        }
    }
}
3.2.4 WriteLock 公平与非公平实现
写锁是排他锁,类似于前面说的 ReentrantLock 的逻辑,具体 tryAcquire 和 tryRelease 代码如下。
public class ReentrantReadWriteLock{
    abstract static class Sync extends AbstractQueuedSynchronizer {
        // 1. tryAcquire 分析
        protected final boolean tryAcquire(int acquires) {
            Thread current = Thread.currentThread();
            // 写线程只有一个,但是可以多次重入
            int c = getState();
            int w = exclusiveCount(c);
            // c != 0 说明有读线程或者写线程持有锁
            if (c != 0) {
                // w == 0,说明锁被读线程持有,只能返回
                // w != 0,持有写锁的线程不是自己,也只能返回
                if (w == 0 || current != getExclusiveOwnerThread())
                    return false;
                // 重入次数溢出了
                if (w + exclusiveCount(acquires) > MAX_COUNT)
                    throw new Error("Maximum lock count exceeded");
                // Reentrant acquire
                setState(c + acquires);
                return true;
            }
            // writerShouldBlock() 由公平、非公平锁具体实现
            if (writerShouldBlock() ||
                !compareAndSetState(c, c + acquires))
                return false;
            setExclusiveOwnerThread(current);
            return true;
        }

        // 2. tryRelease 分析
        protected final boolean tryRelease(int releases) {
            if (!isHeldExclusively())
                throw new IllegalMonitorStateException();
            int nextc = getState() - releases;
            boolean free = exclusiveCount(nextc) == 0;
            if (free)
                setExclusiveOwnerThread(null);
            // 写锁是排他的,是线程安全的,直接减 state 即可
            setState(nextc);
            return free;
        }
    }
}
3.2.5 ReadLock 公平与非公平实现
读锁是共享锁,重写了 tryAcquireShared/tryReleaseShared 方法,其源码如下。
这里加深理解,跑了下读锁各场景下 DEBUG 代码逻辑,详见 com/study/java/concurrent/chapter03/ReentrantReadWriteLockTest.java,其中比较让人容易混淆的点如下。
- 加锁时,高位第一次是 65536,第二次加锁也是 65536 + 65536,因为低位不参与,所以此时不会由 65537。
- 释放锁时,对应的也是每次都减 65536。
public class ReentrantReadWriteLock{
    // 1. tryAcquireShared 分析
    protected final int tryAcquireShared(int unused) {
        Thread current = Thread.currentThread();
        int c = getState();
        // 写锁被某线程持有,并且这个线程还不是自己,读锁肯定拿不到,直接返回
        if (exclusiveCount(c) != 0 &&
            getExclusiveOwnerThread() != current)
            return -1;
        int r = sharedCount(c);
        // 公平和非公平的差异就在于 readerShouldBlock() 函数
        if (!readerShouldBlock() &&
            r < MAX_COUNT &&
            // CAS 拿锁,高 16 位 + 1
            compareAndSetState(c, c + SHARED_UNIT)) {
            // r 之前等于 0,说明这是第 1 个拿到读锁的线程
            if (r == 0) {
                // firstReader、cachedHoldCounter 是一些统计变量,对外的一些查询函数会用到,
                // 例如:查询持有读锁的线程列表,但对整个读写互斥机制没有影响,不展开解释
                firstReader = current;
                firstReaderHoldCount = 1;
            }
            // 不是第 1 个
            else if (firstReader == current) {
                firstReaderHoldCount++;
            } else {
                HoldCounter rh = cachedHoldCounter;
                if (rh == null || rh.tid != getThreadId(current))
                    cachedHoldCounter = rh = readHolds.get();
                else if (rh.count == 0)
                    readHolds.set(rh);
                rh.count++;
            }
            return 1;
        }
        // 上面拿读锁失败,进入这个函数不断自旋拿读锁
        return fullTryAcquireShared(current);
    }

    // 2. tryReleaseShared 分析
    protected final boolean tryReleaseShared(int unused) {
        // ...
        for (;;) {
            int c = getState();
            // 每次都减 65536,即高位每次减 1
            int nextc = c - SHARED_UNIT;
            if (compareAndSetState(c, nextc))
                return nextc == 0;
        }
    }
}
3.3 Condition
3.3.1 Condition 与 Lock 的关系
wait()/notify 必须和 synchronize 一起使用,Condition 也是如此,必须和 Lock 一起使用。核心方法如下。
public interface Condition {
    void await() throws InterruptedException;
    void awaitUninterruptibly();
    void signal();
    void signalAll();
}

public interface Lock {
    void lock();
    void lockInterruptibly() throws InterruptedException;
    boolean tryLock();
    boolean tryLock(long time, TimeUnit unit) throws InterruptedException;
    void unlock();
    // 所有的 Condition 都是从 Lock 中构造出来的
    Condition newCondition();
}
3.3.2 Condition 的使用场景
如实现生产者、消费者队列时,是一把锁加 2 个条件,实现精确唤醒指定线程,一个典型的范例就是 ArrayBlockingQueue 的实现。如下。
public class ArrayBlockingQueue<E> {
final Object[] items;
    int takeIndex;
    int putIndex;
    int count;

    // 其核心就是一把锁+两个条件
    final ReentrantLock lock;
    private final Condition notEmpty;
    private final Condition notFull;

    public ArrayBlockingQueue(int capacity, boolean fair) {
        if (capacity <= 0)
            throw new IllegalArgumentException();
        this.items = new Object[capacity];
        // 构造一把锁+两个条件
        lock = new ReentrantLock(fair);
        notEmpty = lock.newCondition();
        notFull =  lock.newCondition();
    }

    public void put(E e) throws InterruptedException {
        checkNotNull(e);
        final ReentrantLock lock = this.lock;
        lock.lockInterruptibly();
        try {
            while (count == items.length)
                // put 的时候,队列满了,阻塞于 “非满” 条件
                notFull.await();
            enqueue(e);
        } finally {
            lock.unlock();
        }
    }

    private void enqueue(E x) {
        final Object[] items = this.items;
        items[putIndex] = x;
        if (++putIndex == items.length)
            putIndex = 0;
        count++;
        // put 进去之后,通知非空条件
        notEmpty.signal();
    }

    public E take() throws InterruptedException {
        final ReentrantLock lock = this.lock;
        lock.lockInterruptibly();
        try {
            while (count == 0)
                // take 的时候,队列尾款,阻塞于 “非空” 条件
                notEmpty.await();
            return dequeue();
        } finally {
            lock.unlock();
        }
    }

     private E dequeue() {
        final Object[] items = this.items;
        E x = (E) items[takeIndex];
        items[takeIndex] = null;
        if (++takeIndex == items.length)
            takeIndex = 0;
        count--;
        if (itrs != null)
            itrs.elementDequeued();
        // take 操作完成,通知非满条件
        notFull.signal();
        return x;
    }
}
手写生产者、消费示例见 com/study/java/concurrent/chapter03/ProducerModel02Test.java。
3.3.3 Condition实现原理
注意 Condition 必须和 Lock 一起使用,可以先看下互斥锁和读写锁中 Condition 的构造。
public abstract class AbstractQueuedSynchronizer{

    final ConditionObject newCondition() {
        // Condition 的所有实现,都在 ConditionObject 里面
        return new ConditionObject();
    }

    public class ConditionObject{
        // 每一个 Condition 对象上面,都阻塞了多个线程,因此本对象内部也有一个双向链表组成的队列
        private transient Node firstWaiter;
        private transient Node lastWaiter;
    }
}

public class ReentrantLock{
    public Condition newCondition() {
        return sync.newCondition();
    }
}

public class ReentrantReadWriteLock{
    public static class ReadLock{
        public Condition newCondition() {
            // 读锁不支持 Condition
            throw new UnsupportedOperationException();
        }
    }

    public static class WriteLock {
        public Condition newCondition() {
            return sync.newCondition();
        }
    }
}
3.3.4 await 实现分析
看下 ConditionObject 里面的 await 方法源码。
public abstract class AbstractQueuedSynchronizer{
    public class ConditionObject{
        /** 进 await 方法时,已经拿到锁了 */
        public final void await() throws InterruptedException {
            // 收到中断信号,抛出异常
            if (Thread.interrupted())
                throw new InterruptedException();
            // 加入 Condition 的等待队列,线程安全,不需要 CAS 操作
            Node node = addConditionWaiter();
            // 阻塞在 Condition 之前,必须先释放锁,否则会死锁
            long savedState = fullyRelease(node);
            int interruptMode = 0;
            // 判断该 node 是否在 AQS 的同步队列里面,初始只在 Condition 队列里面,执行 notify 操作的时候,会放进 AQS 队列里面
            while (!isOnSyncQueue(node)) {
                // 自己阻塞自己
                LockSupport.park(this);
                // checkXX 是做异常中断补偿
                if ((interruptMode = checkInterruptWhileWaiting(node)) != 0)
                    break;
            }
            // 被唤醒后,需要重新拿锁
            if (acquireQueued(node, savedState) && interruptMode != THROW_IE)
                interruptMode = REINTERRUPT;
            if (node.nextWaiter != null) // clean up if cancelled
                unlinkCancelledWaiters();
            if (interruptMode != 0)
                // 被中断唤醒,向外抛出中断异常
                reportInterruptAfterWait(interruptMode);
        }

        private Node addConditionWaiter() {
            Node t = lastWaiter;
            if (t != null && t.waitStatus != Node.CONDITION) {
                unlinkCancelledWaiters();
                t = lastWaiter;
            }
            Node node = new Node(Thread.currentThread(), Node.CONDITION);
            if (t == null)
                firstWaiter = node;
            else
                t.nextWaiter = node;
            lastWaiter = node;
            return node;
        }
    }
}
3.3.5 awaitUninterruptibly() 实现分析
代码和 await 相似,但是不会响应中断,源码如下。
public abstract class AbstractQueuedSynchronizer{
    public class ConditionObject{
        public final void awaitUninterruptibly() {
            Node node = addConditionWaiter();
            long savedState = fullyRelease(node);
            boolean interrupted = false;
            while (!isOnSyncQueue(node)) {
                LockSupport.park(this);
                // 从 park 中醒来,收到中断,不退出,继续执行 while 循环
                if (Thread.interrupted())
                    interrupted = true;
            }
            if (acquireQueued(node, savedState) || interrupted)
                selfInterrupt();
        }
    }
}
3.3.6 notify() 实现分析
源码如下。
public abstract class AbstractQueuedSynchronizer{
    final boolean transferForSignal(Node node) {
        if (!compareAndSetWaitStatus(node, Node.CONDITION, 0))
            return false;

        // 先把 node 放入互斥锁的同步队列里,再调用下面的 unpark
        // 这里对应 await 方法中的 while (!isOnSyncQueue(node)),即 while(false) 时,说明 await 不是被中断,而是被 unpark 唤醒的
        Node p = enq(node);
        int ws = p.waitStatus;
        if (ws > 0 || !compareAndSetWaitStatus(p, ws, Node.SIGNAL))
            LockSupport.unpark(node.thread);
        return true;
    }

    public class ConditionObject{
        public final void signal() {
            // 只有持有锁的线程,才有资格调用 signal()
            if (!isHeldExclusively())
                throw new IllegalMonitorStateException();
            Node first = firstWaiter;
            if (first != null)
                doSignal(first);
        }

        private void doSignal(Node first) {
            // 唤醒队列中的第一个线程
            do {
                if ( (firstWaiter = first.nextWaiter) == null)
                    lastWaiter = null;
                first.nextWaiter = null;
            } while (!transferForSignal(first) &&
                     (first = firstWaiter) != null);
        }
    }
}
3.4 StampedLock
3.4.1 为什么引入StampedLock
StampedLock 读与读不互斥,读与写不互斥,写于写互斥。提高了并发度。
StampedLock 引入了“乐观读”策略,读的时候不加读锁,读出来发现数据被修改后,再升级为“悲观读”,设计上有点像 MySQL 的核心机制 MVCC,即一份数据,多个副本。
3.4.2 StampedLock 使用场景
适合一把写锁,多个读锁场景,读写锁不互斥,具体示例见 com/study/java/concurrent/chapter03/StampedLockPointTest.java。
核心代码如下。
// 1. 拷贝一份数据到线程的栈内存中
long stamp = sl.tryOptimisticRead();
// 2. 读数据
double currentX = x, currentY = y;
// 3. 比对数据版本号,validate 插入了内存屏障禁止重排序
if(!sl.validate(stamp)){}
使用样例参考 深入剖析Java并发库(JUC)之StampedLock的应用与原理。
3.4.3 “乐观读”实现原理
和读写锁 ReentrantReadWriteLock 类似,额外加了个版本号,如下。
public class StampedLock{
    private static final int LG_READERS = 7;

    private static final long RUNIT = 1L;
    // 第 8 位表示写锁,写锁只有一个 bit 位,因此写锁是不可重入的 值为:10000000
    private static final long WBIT  = 1L << LG_READERS;
    // 最低的 7 位表示读锁
    private static final long RBITS = WBIT - 1L;
    // 读锁的数目
    private static final long RFULL = RBITS - 1L;
    // 读锁和写锁的状态合到一起  ~255 11111111111111111111111111111111111111111111111111111111 1000 0000
    private static final long ABITS = RBITS | WBIT;
    // -128
    private static final long SBITS = ~RBITS;

    // state 的初始值 值为:100000000
    private static final long ORIGIN = WBIT << 1;
    private transient volatile long state;

    public StampedLock() {
        state = ORIGIN;
    }
}
为什么 state 的初始值不为 0 呢?看以下实现代码。
public class StampedLock{
    public long tryOptimisticRead() {
        long s;
        // state & WBIT != 0,持有写锁,返回 0
        return (((s = state) & WBIT) == 0L) ? (s & SBITS) : 0L;
    }

    /** tryOptimisticRead 写锁有锁时,stamp 为 0,validate 方法永远返回 false  */
    public boolean validate(long stamp) {
        U.loadFence();
        return (stamp & SBITS) == (state & SBITS);
    }
}
这里巧妙的用了一个变量,既实现了读锁、写锁的状态记录,还实现了数据的版本号的记录。具体这里不阐述了,可以查阅源码和资料了解。
3.4.3 悲观读/写:“阻塞”与“自旋”策略实现差异
StampedLock 的悲观的读锁和写锁操作不是基于 AQS 实现的,而是内部重新实现了一个阻塞队列。
public class StampedLock{
    private transient volatile WNode whead;
    private transient volatile WNode wtail;

    static final class WNode {
        volatile WNode prev;
        volatile WNode next;
        volatile WNode cowait;
        volatile Thread thread;
        // 取值 0, WAITING, or CANCELLED
        volatile int status;
        // 取值 RMODE or WMODE
        final int mode;
        WNode(int m, WNode p) { mode = m; prev = p; }
    }
}
AQS 中一个线程 CAS state 失败之后,会立即加入阻塞队列,并且进入阻塞状态,但在 StampedLock 中,CAS state 失败之后,会不断自旋,自旋足够多的次数之后,如果还拿不到锁,才进入阻塞状态。为此,根据 CPU 的核数,定义了自旋次数的常量值。注意如果是单核的 CPU,不会自旋,多核才会采用自旋策略。
代码相对比较复杂,源码如下。
public class StampedLock{
    private static final int NCPU = Runtime.getRuntime().availableProcessors();

    // 最大自旋次数
    private static final int SPINS = (NCPU > 1) ? 1 << 6 : 0;

    public long writeLock() {
        long s, next;
        // state & ABITS == 0 的时候,说明既没有线程持有读锁,也没有线程持有写锁
        // 此时当前线程才有资格通过 CAS 操作 state,若不成功,则调用 acquireWrite 函数进入阻塞队列,并进行自旋
        return ((((s = state) & ABITS) == 0L &&
                 U.compareAndSwapLong(this, STATE, s, next = s + WBIT)) ?
                next : acquireWrite(false, 0L));
    }

    private long acquireWrite(boolean interruptible, long deadline) {
        WNode node = null, p;
        // 第一个大循环目的就是将 Node 加入队列的尾部,一边加入,一边通过 CAS 操作尝试获得锁。
        // 如果获得了,函数就会返回,如果不能获得,会一直自旋,指导加入队列尾部
        for (int spins = -1;;) {
            long m, s, ns;
            if ((m = (s = state) & ABITS) == 0L) {
                if (U.compareAndSwapLong(this, STATE, s, ns = s + WBIT))
                    // 自旋的时候拿到了锁,函数返回
                    return ns;
            }
            else if (spins < 0)
                spins = (m == WBIT && wtail == whead) ? SPINS : 0;
            else if (spins > 0) {
                if (LockSupport.nextSecondarySeed() >= 0)
                    // 不断自旋,以一定的概率把 spins 值往下累减
                    --spins;
            }
            // 初始化队列
            else if ((p = wtail) == null) {
                WNode hd = new WNode(WMODE, null);
                if (U.compareAndSwapObject(this, WHEAD, null, hd))
                    wtail = hd;
            }
            else if (node == null)
                node = new WNode(WMODE, p);
            else if (node.prev != p)
                node.prev = p;
            else if (U.compareAndSwapObject(this, WTAIL, p, node)) {
                p.next = node;
                // for 循环唯一的 break,CAS tail 成功(成功加入队列尾部),才会退出 for 循环
                break;
            }
        }

        // 第二个大循环中,该 Node 已经在队列尾部了。注意当 release 函数被调用后,会唤醒队列头部的第 1 个元素,重新开始大循环逻辑
        // WNode 里面的 cowait 指针,用于串联起所有的读线程,将所有的读线程一起唤醒
        for (int spins = -1;;) {
            WNode h, np, pp; int ps;
            // 如果自己恰好也在头部,此时进行一轮新的自旋,直到达到 MAX_HEAD_SPINS 次数,然后进入阻塞。
            if ((h = whead) == p) {
                if (spins < 0)
                    spins = HEAD_SPINS;
                else if (spins < MAX_HEAD_SPINS)
                    spins <<= 1;
                // 在头部开始自旋
                for (int k = spins;;) {
                    long s, ns;
                    // 再次尝试拿锁
                    if (((s = state) & ABITS) == 0L) {
                        if (U.compareAndSwapLong(this, STATE, s,
                                                 ns = s + WBIT)) {
                            whead = node;
                            node.prev = null;
                            return ns;
                        }
                    }
                    // 不断自旋
                    else if (LockSupport.nextSecondarySeed() >= 0 &&
                             --k <= 0)
                        break;
                }
            }
            else if (h != null) { // help release stale waiters
                WNode c; Thread w;
                // 自己从阻塞中唤醒,然后唤醒 cowait 中的所有 reader 线程
                while ((c = h.cowait) != null) {
                    if (U.compareAndSwapObject(h, WCOWAIT, c, c.cowait) &&
                        (w = c.thread) != null)
                        U.unpark(w);
                }
            }
            if (whead == h) {
                if ((np = node.prev) != p) {
                    if (np != null)
                        (p = np).next = node;   // stale
                }
                else if ((ps = p.status) == 0)
                    U.compareAndSwapInt(p, WSTATUS, 0, WAITING);
                else if (ps == CANCELLED) {
                    if ((pp = p.prev) != null) {
                        node.prev = pp;
                        pp.next = node;
                    }
                }
                else {
                    long time; // 0 argument to park means no timeout
                    if (deadline == 0L)
                        time = 0L;
                    else if ((time = deadline - System.nanoTime()) <= 0L)
                        return cancelWaiter(node, node, false);
                    Thread wt = Thread.currentThread();
                    U.putObject(wt, PARKBLOCKER, this);
                    node.thread = wt;
                    if (p.status < 0 && (p != h || (state & ABITS) != 0L) &&
                        whead == h && node.prev == p)
                        // 进入阻塞状态,之后被另外一个线程 release 唤醒,接着往下执行这个 for 循环
                        U.park(false, time);
                    node.thread = null;
                    U.putObject(wt, PARKBLOCKER, null);
                    if (interruptible && Thread.interrupted())
                        return cancelWaiter(node, node, true);
                }
            }
        }
    }
}
锁的释放源码如下。
public class StampedLock{
    public void unlockWrite(long stamp) {
        WNode h;
        if (state != stamp || (stamp & WBIT) == 0L)
            throw new IllegalMonitorStateException();
        // 释放锁,把 state 回归原位
        state = (stamp += WBIT) == 0L ? ORIGIN : stamp;
        if ((h = whead) != null && h.status != 0)
            // 唤醒队列头部的第一个节点
            release(h);
    }

    private void release(WNode h) {
        if (h != null) {
            WNode q; Thread w;
            U.compareAndSwapInt(h, WSTATUS, WAITING, 0);
            if ((q = h.next) == null || q.status == CANCELLED) {
                for (WNode t = wtail; t != null && t != h; t = t.prev)
                    if (t.status <= 0)
                        q = t;
            }
            if (q != null && (w = q.thread) != null)
                // 节点被唤醒之后,会执行上面拿锁的第二个大的 for 循环自旋拿锁。
                U.unpark(w);
        }
    }
}